»óÇ°Ä«Å×°í¸® > ¼¾¼­ > Àü·ù/Àü¾Ð/Àü±â

Gravity ECÃøÁ¤±â Àü±âÀüµµ ¹ÌÅÍ / Gravity: Analog Electrical Conductivity Sensor / Meter For Arduino
ÆǸŰ¡°Ý : 110,000¿ø (ºÎ°¡¼¼ Æ÷ÇÔ)
»óÇ°ÄÚµå : [10701]ZAS-DFR-PTW-DFR0300
¹è¼ÛÀÏ : ´çÀϹ߼Û
Á¦Á¶»ç : DFRobot
ºê·£µå : DFRobot [ºê·£µå¸ô ¹Ù·Î°¡±â]
³²Àº¼ö·® : 5°³
±¸¸Å¼ö·® :
°³
ÃÑ ±Ý¾× :
Ãß°¡&´ë·®±¸¸Å ¿äû 053-588-4080

  • »óÇ°»ó¼¼
  • °ü·Ã»óÇ°
  • ¹è¼Û/±³È¯/¹ÝÇ° ¾È³»
  • »óÇ°¸®ºä
½Ã¼³³ó¾÷¿¡¼­ ¼öÈ®·®ÀÇ °¨¼Ò ¹× Ç°ÁúÀúÇϸ¦ ÁÙÀÏ ¼ö ÀÖ´Â Åä¾ç ¿°·ùÁýÀû °ü¸®¸¦ À§ÇØ EC¼¾¼­¸¦ »ç¿ëÇÏ°ï ÇÕ´Ï´Ù. ±âÁ¸ÀÇ ¼¾¼­µéÀº °íºñ¿ëÀ̾úÁö¸¸, º» Á¦Ç°Àº ÁÁÀº °á°ú°ª°ú Àú·ÅÇÑ °¡°ÝÀ¸·Î ¸¹ÀÌ ¾Ö¿ëµÇ°í ÀÖ½À´Ï´Ù.
Á¦Ç°ÀÇ Á¤È®µµ¸¦ À§ÇØ ¿Âµµ¼¾¼­¸¦ ÇÔ²² »ç¿ëÇϴ°ÍÀ» Ãßõµå¸®°í ÀÖ½À´Ï´Ù. ¿Âµµ¼¾¼­´Â DS18B20À» »ç¿ëÇÏ½Ã¸é µË´Ï´Ù.
DFR0300-Arduino Connection Diagram

¼Ò½ºÄÚµå
// # 
// # Editor     : YouYou from DFRobot
// # Date       : 23.04.2014
// # E-Mail : youyou.yu@dfrobot.com

// # Product name: Analog EC Meter
// # Product SKU : DFR0300
// # Version     : 1.0

// # Description:
// # Sample code for testing the EC meter and get the data feedback from the Arduino Serial Monitor.
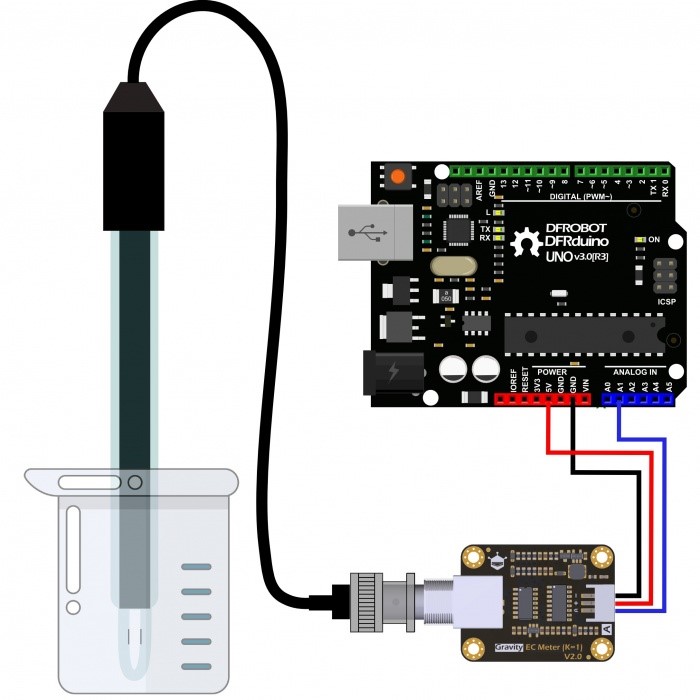
// # Connection:
// #        EC meter output     -> Analog pin 1
// #        DS18B20 digital pin -> Digital pin 2
// #

#include

#define StartConvert 0
#define ReadTemperature 1

const byte numReadings = 20;     //the number of sample times
byte ECsensorPin = A1;  //EC Meter analog output,pin on analog 1
byte DS18B20_Pin = 2; //DS18B20 signal, pin on digital 2
unsigned int AnalogSampleInterval=25,printInterval=700,tempSampleInterval=850;  //analog sample interval;serial print interval;temperature sample interval
unsigned int readings[numReadings];      // the readings from the analog input
byte index = 0;                  // the index of the current reading
unsigned long AnalogValueTotal = 0;                  // the running total
unsigned int AnalogAverage = 0,averageVoltage=0;                // the average
unsigned long AnalogSampleTime,printTime,tempSampleTime;
float temperature,ECcurrent; 
 
//Temperature chip i/o
OneWire ds(DS18B20_Pin);  // on digital pin 2

void setup() {
 // initialize serial communication with computer:
  Serial.begin(115200);
  // initialize all the readings to 0:
  for (byte thisReading = 0; thisReading < numReadings; thisReading++)
    readings[thisReading] = 0;
  TempProcess(StartConvert);   //let the DS18B20 start the convert
  AnalogSampleTime=millis();
  printTime=millis();
  tempSampleTime=millis();
}

void loop() {
  /*
   Every once in a while,sample the analog value and calculate the average.
  */
  if(millis()-AnalogSampleTime>=AnalogSampleInterval)  
  {
    AnalogSampleTime=millis();
     // subtract the last reading:
    AnalogValueTotal = AnalogValueTotal - readings[index];
    // read from the sensor:
    readings[index] = analogRead(ECsensorPin);
    // add the reading to the total:
    AnalogValueTotal = AnalogValueTotal + readings[index];
    // advance to the next position in the array:
    index = index + 1;
    // if we're at the end of the array...
    if (index >= numReadings)
    // ...wrap around to the beginning:
    index = 0;
    // calculate the average:
    AnalogAverage = AnalogValueTotal / numReadings;
  }
  /*
   Every once in a while,MCU read the temperature from the DS18B20 and then let the DS18B20 start the convert.
   Attention:The interval between start the convert and read the temperature should be greater than 750 millisecond,or the temperature is not accurate!
  */
   if(millis()-tempSampleTime>=tempSampleInterval) 
  {
    tempSampleTime=millis();
    temperature = TempProcess(ReadTemperature);  // read the current temperature from the  DS18B20
    TempProcess(StartConvert);                   //after the reading,start the convert for next reading
  }
   /*
   Every once in a while,print the information on the serial monitor.
  */
  if(millis()-printTime>=printInterval)
  {
    printTime=millis();
    averageVoltage=AnalogAverage*(float)5000/1024;
    Serial.print("Analog value:");
    Serial.print(AnalogAverage);   //analog average,from 0 to 1023
    Serial.print("    Voltage:");
    Serial.print(averageVoltage);  //millivolt average,from 0mv to 4995mV
    Serial.print("mV    ");
    Serial.print("temp:");
    Serial.print(temperature);    //current temperature
    Serial.print("^C     EC:");
    
    float TempCoefficient=1.0+0.0185*(temperature-25.0);    //temperature compensation formula: fFinalResult(25^C) = fFinalResult(current)/(1.0+0.0185*(fTP-25.0));
    float CoefficientVolatge=(float)averageVoltage/TempCoefficient;   
    if(CoefficientVolatge<150)Serial.println("No solution!");   //25^C 1413us/cm<-->about 216mv  if the voltage(compensate)<150,that is <1ms/cm,out of the range
    else if(CoefficientVolatge>3300)Serial.println("Out of the range!");  //>20ms/cm,out of the range
    else
    { 
      if(CoefficientVolatge<=448)ECcurrent=6.84*CoefficientVolatge-64.32;   //1ms/cm
      else if(CoefficientVolatge<=1457)ECcurrent=6.98*CoefficientVolatge-127;  //3ms/cm
      else ECcurrent=5.3*CoefficientVolatge+2278;                           //10ms/cm
      ECcurrent/=1000;    //convert us/cm to ms/cm
      Serial.print(ECcurrent,2);  //two decimal
      Serial.println("ms/cm");
    }
  }

}
/*
ch=0,let the DS18B20 start the convert;ch=1,MCU read the current temperature from the DS18B20.
*/
float TempProcess(bool ch)
{
  //returns the temperature from one DS18B20 in DEG Celsius
  static byte data[12];
  static byte addr[8];
  static float TemperatureSum;
  if(!ch){
          if ( !ds.search(addr)) {
              Serial.println("no more sensors on chain, reset search!");
              ds.reset_search();
              return 0;
          }      
          if ( OneWire::crc8( addr, 7) != addr[7]) {
              Serial.println("CRC is not valid!");
              return 0;
          }        
          if ( addr[0] != 0x10 && addr[0] != 0x28) {
              Serial.print("Device is not recognized!");
              return 0;
          }      
          ds.reset();
          ds.select(addr);
          ds.write(0x44,1); // start conversion, with parasite power on at the end
  }
  else{  
          byte present = ds.reset();
          ds.select(addr);    
          ds.write(0xBE); // Read Scratchpad            
          for (int i = 0; i < 9; i++) { // we need 9 bytes
            data[i] = ds.read();
          }         
          ds.reset_search();           
          byte MSB = data[1];
          byte LSB = data[0];        
          float tempRead = ((MSB << 8) | LSB); //using two's compliment
          TemperatureSum = tempRead / 16;
    }
          return TemperatureSum;  
}
Why measure EC? The salinity of the soil, irrigation water systems or fertilizer solutions is an important parameter affecting the root zone environment of your plants. Any of these factors can have a significant effect on plant growth and quality. The presence of high salt levels is your warning sign to make adjustments. Low-salt levels could lead to nutrient deficiencies. Don¡¯t wait for trouble, measure before the damage shows in your plants. In terms of liquid, we often use the reciprocal of resistance, which is conductance, as a measurement. The conductivity of water can reflect the level of electrolytes present in the water. Depending on the concentration of the electrolyte, the conductivity of the aqueous solution is different.
 
This Analog EC Meter is unique. It is designed specially for Arduino controllers and has built-in simple, convenient and practical features. After simple connections according to our diagram and uploading the program, you will be able to measure the EC value easily. 


  • Operating Voltage: +5.00 V
  • PCB Size: 45 ¡¿ 32mm
  • Measuring Range: 1ms/cm -- 20ms/cm
  • Operating Temperature: 5 - 40 ¡É
  • Accuracy: < ¡¾5% F.S (using Arduino 10 bits ADC)
  • PH2.0 Interface (3-pin SMD)
  • Conductivity Electrode (Electrode Constant K = 1,BNC connector)
  • Cable Length of the Electrode: about 60cm
  • DS18B20 Temperature Sensor(Waterproof)
  • Power Indicator


    ¸ÞÄ«¸®¿öÁî


    °ßÀû¿äû
    ±¸¸Å´ëÇà
    Äü/¹æ¹®¼ö·É
    ÈĺҰáÁ¦
    ±â¼ú¹®ÀÇ